

No road trip or adventure in this post, just something that you may find quite valuable as a first gen CRX owner, classic Honda owner, or even an owner of any linkage style Honda transmission. In the 1st Gen CRX community, parts, OEM or aftermarket, are few and far between, so when I hear about any new part that fit's our cars, I'm interested. I was recently approached by the owner of Dyno Designs out of Tennessee. He introduced me to his part, the Tyrannosaur Tightener, and asked if I would give it a test run, and share my thoughts about it on the blog. I was more than happy to oblige, and a short time later, the part was in my mailbox.
After my conversation with Cameron, the owner of Dyno Designs, I refrained from doing further research on the part until it was in my possession. I wanted to keep an open mind, and experience the part purchase as if I were any other customer. Since I had very little knowledge of the part, and directions for the installation were not included, I needed to some research before I could move forward.
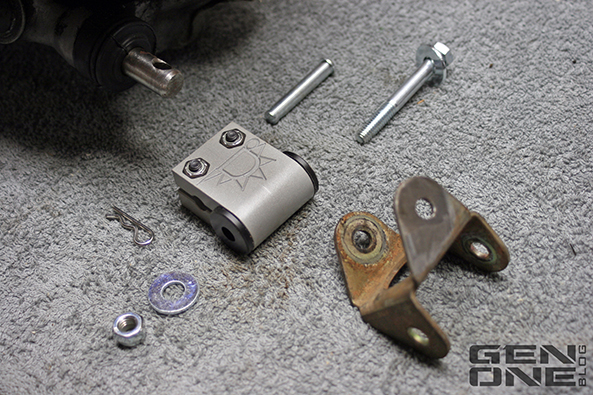
The part came neatly wrapped in a heavy paper to keep it from getting damaged during shipping. After unwrapping the part, which came assembled, I was immediately impressed with the quality of the part. The part is machined out of aluminum and then sprayed with a protective coating. On both sides of the part, the company logo has been machined, which based on its name and the spikes around the letter 'D', I conclude that it's dinosaur related. It comes with a Delrin bushing installed, and the other hardware that comes with the part includes two Allen head bolts with Nylock nuts, one clevis pin with a reusable cotter pin, and a long bolt with two washers and a nut. All the hardware is corrosion resistant.

The Tyrannosaur Tightener is a shift knuckle. It costs $125 (plus shipping) and it fits all Honda linkage style transmissions (B and D series). It was designed to replace the factory Roll Pin or Bitch Pin, as it is more commonly referred to as. The factory Roll Pin received it's apt nickname for a good reason. It's a serious pain to remove and reinstall, but that's not its only flaw. The rubber bushings in the factory shift knuckle get old, rotten and brittle, creating slop in your shift linkage. The Tyrannosaur's design takes care of all these issues. The combination of Allen bolts and the Clevis Pin make it absurdly simple to remove and install, as well as ensure that the linkage will never come off. The Allen bolts that secure the part on to the shift rod, via friction, are more than sufficient to secure the part to the transmission, but to ensure that the linkage stays attached, the clevis pin acts as a redundancy by fitting through the housing of the part and the hole in the end of the shift rod. Lastly, the bushings in the Tyrannosaur are made of Delrin instead of rubber. Delrin is a thermoplastic engineered polymer that was created to out perform other plastics in harsh environments. Some of the benefits of Delrin include:
Toughness at low temperature ( -40 degrees C )
High mechanical strength and rigidity
Fatigue endurance unmatched by other plastics
High resistance to repeated impacts
Excellent resistance to moisture, gasolines, solvents and many other chemicals
With the replacement of the rubber bushings, and the sturdy attachment method to the transmission, this part should remove any potential issues with slop at this particular point in the shift linkage.


Now that we've covered what this part was designed to do, let's see if it can back up it's impressive construction, hardware and list of promises. Since there were no installation instructions, I had to find another source of information for this process. I was able to find a promotional video for the part on YouTube:
https://www.youtube.com/watch?v=zySrV9CJJwY
Although the video was helpful, for someone who isn't very familiar with Honda's linkage style transmissions, it might be difficult to understand without some added visuals. Here are the steps I took to install the part.
Step 1
To start, you need to remove the factory shift knuckle and Roll Pin. It's the T-shaped part that is at the very end of your shift linkage, closest to the transmission. Slide the round metal keeper off the shift knuckle to expose the dreaded bitch (Roll) pin. Probably the best way to remove this pin is with a C-clamp, a small socket, and a drill bit. Make sure the socket is wide enough to allow the pin to slide into. The drill bit also needs to be large enough to press the pin through the shift hole, but small enough to fit into the same hole. Position the socket and drill bit on opposite sides of the shift knuckle housing and in line with the Roll Pin hole. Then take the C-clamp and compress the drill bit against the pin, forcing it out, though the shift rod and into the socket. Once the the pin is removed, slide the shift knuckle and linkage off the shift rod. Next, take a grinder and grind off the two rivets securing the factory shift knuckle to the shift linkage. Before installing the Tyrannosaur, make sure the shift rod is clean and devoid of rust and grease.

Below you can see where the Tyrannosaur fits in the factory shift linkage.

Since the part comes with all its hardware assembled, you'll need to remove the long bolt, washers and nut, as well as the clevis pin and reusable cotter pin, before you try to install the part.
Step 2
Slide the Tyrannosaur onto the shift rod, lining up the hole in the part housing with the hole in the shift rod.

Step 3
Slide the clevis pin into the part housing and through the shift rod. Make sure to install it from the top side down so the reusable cotter pin is easy to access.

Step 4
Install the reusable cotter pin into the bottom of the clevis pin. Once the clevis pin is installed, tighten down the Allen bolts with an Allen wrench.

Step 5
Position your shift linkage over the Tyrannosaur's Delrin bushing and line up the holes.

Step 6
Install the long bolt with washer through the linkage knuckle and into the Delrin bushing.

Step 7
Install the washer and nut onto the end of the long bolt.

That's it, you're done.


In conclusion, the Tyrannosaur Tightener is all that it's cracked up to be. It's a well made part that does exactly what it was designed to do. It eliminates the hassle of the 'bitch pin', removes any play in the linkage at the shift rod with the removal of the rubber bushings, and makes it easy to remove and install your shift linkage. This is perfect for those who either remove their engine or transmission on a regular basis or who want to get the most out of their aftermarket shifter setup. Not only that, the people at Dyno Designs are a joy to work with. Two thumbs up!
If you are interested in purchasing a Tyrannosaur Tightener or just acquiring additional information, contact Dyno Designs at this email: Dynodesigns615@gmail.com


I wouldn't use a drill bit for pressing due to the fact that drill bits a brittle and could break off hitting you in the face. I'd use an Allen socket instead if you need to go the pressing route.
ReplyDeleteLooks like a decent product.
I wouldn't use a drill bit for pressing due to the fact that drill bits a brittle and could break off hitting you in the face. I'd use an Allen socket instead if you need to go the pressing route.
ReplyDeleteLooks like a decent product.
I see what you're saying. I guess I wasn't clear about what kind of drill bit. I didn't mean the kind of bit you would just to pre-drill holes in wood for screws for example, but a drill attachment such as a square drive bit, or a star bit.
ReplyDeleteInterested in the design of this item, I notice were the push pin originally located you now have the new pin with the cotter going into the original location. This would push the linkage towards the rear of the car about 1". how does this effect the shifter, or am i looking at this wrong?
ReplyDeleteSorry for just now seeing your comment. The distance between the bores of the clevis pin and the bolt that holds the linkage on is the same on the Tightener, as it is on the factory part. If you look at the second picture in step 1 it shows the part it replaces. It's difficult to judge with pictures, but it's the same.
DeleteHey man, i'm really late to the party but i just discovered this... How is it? Has shifter slop been reduced? If so, by how much? Is there still any slop when it's in gear?
ReplyDeleteThanks!